
Taking screenshots is a great way to save pictures on your desktop, but if this is your first time doing it, it might not be straightforward how to do it on a Windows PC.
Within Windows, there are several simple ways to complete this task. We’ll go over each of them in more depth below. Yes, most of these steps work just as well in Windows 11 as they do in Windows 10. Find out how to take a picture on a Windows PC by reading on.
Snipping tool in Windows 10 and 11
As of now, the Snipping Tool is the best way to take a picture in Windows. While this built-in screen-capture tool does its job, it could be more powerful and flexible when it comes to saving a picture. That being said, it is a tool that helps users better identify and take screenshots of parts of their desktop. How to use it.
Step 1: Type “snipping tool” into the search box in the menu to begin. Then, choose the app that comes up. If you have Windows 10, it will tell you when it starts that it’s “moving to a new home” in a later update. Do not worry. It’s still a tool in Windows 11, but Microsoft wants you to use the Win + Shift + S keyboard command instead.
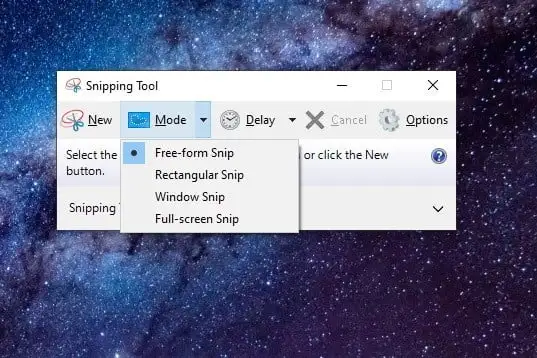
Step 2: Press the Mode button on Windows 10 to make the menu bigger. You can take a picture of the screen in four different ways: draw a window (Free-form snip), box in an area (Rectangular snip), take a picture of the current window (Window snip), or take a picture of the whole screen (Full-screen snip).
Either choose “New” or press the Windows key + Shift + S on your computer to begin a snip in Windows 11. After you do either of those things, the screen will get a little darker and show you the four “mode” choices we talked about above.
To start taking a picture, choose one of these modes.
Step 3: The Snipping Tool interface will show you the picture after you take it. You can make small changes, like erasing something or using a pen or marker.
(In Windows 11, you may have to choose a message that pops up first in order to open the editing screen.)
Step 4: When you’re done making changes in the Snipping Tool, click the “File” button in the upper left corner and then choose “Save as” from the drop-down menu.

In Windows 11: Go to the top right corner and click on the Save as disk icon. A screen will appear. Name your file, and then click the Save button.
Snip & Sketch tool in Windows 10
Microsoft’s snipping tool has been updated to Snip & Sketch. It’s a great way to take a picture on your Windows PC. You can get to this tool by hitting Win + Shift + S or going to the Start menu.
Note: Windows 11 no longer supports Snip & Sketch. It has been replaced by a new version of the Snipping Tool app that has some of the same features. Still, the steps below (especially steps 1, 2, and 4) should work for Windows 11’s Snipping Tool in most cases.
Step 1: Press the keyboard shortcut. This makes the screen darker and adds a five-button menu to the top. It does everything the old Snipping Tool did, but it doesn’t save your screenshots as a file. The picture goes straight to your clipboard instead.
Step 2: You’ll also see a message on your screen that says the picture has been copied to the clipboard. You can change the picture you took in the Snip & Sketch app using this same message. This last choice can be reached by clicking on the desktop notification itself. When you click on the notice, the screenshot opens in the app. You can crop the picture and use a pen, pencil, highlighter, or eraser on it.
Step 3: Open the Snip & Sketch app. In the upper left area, click the drop-down arrow next to the “New” button. From the menu that appears, choose “Snip now.” The screen gets darker, and a menu with five buttons shows up. If you take a picture, the Snip & Sketch app should automatically load the picture you want to change.
Step 4: You can save the picture to any location on your computer by clicking the disc-style button. To open with a certain program, click the three-dot icon in the toolbar and choose “Open with” from the choice that appears. You can then edit and save the picture using any installed image editor. As of Windows 11, all you have to do to change the picture is click the “Edit in Paint” button.
Print screen keyboard shortcuts
Windows gives you six keyboard tools that you can use to take a picture of your desktop. Three of them use the Print Screen (PrtScn) key, and the other three need the Windows (Win) key.
External keyboards have a key in the top right corner that is only for PrtScn. Most of the time, the Win key is in the lower left corner, between the Alt and Control keys. It is easy to find because it has the Windows brand on it.
On computers, the Print Screen command can be paired with another key that does something else. In this case, you need to press the Print Screen key along with the Function (Fn) key.
The six screen-capture directions are broken down below:
- Print Screen (PrtScn): Takes a picture of the whole screen. If you have more than one screen, this function takes a picture of everything that’s on all of them at the same time. This way doesn’t save your picture as a file by default; it just copies it to the Windows clipboard. Remove the checkbox next to Use the Print Screen key to open Snipping Tool in Settings > Accessibility > Keyboard to disable this feature.
- Alt + Print Screen: Takes a picture of just one window. Make sure the window you want to select is highlighted first, like a browser or document, before you press these two keys (or three on some computers). This method doesn’t save your picture as a file by default; it just copies the picture in the grab window to the clipboard.
- Win + Print Screen: The entire screen can be printed off by pressing Win + Print Screen. Windows uses a different method to store the photo. By default, it will be transferred to either C: Users`Pictures>Screenshots or C: Users^OneDrive>Pictures>Screenshots on your PC.
- Win + Shift + S: With Win + Shift + S, you can take a picture with Snip & Sketch, the built-in screenshot tool, or the new Snipping Tool app in Windows 11. On a compact menu, you can find four options—not including the “Exit” icon—for snipping: rectangular, freeform, window, and fullscreen. Subdues the display. Instead of saving the photographs created by this tool, they are copied to the clipboard.
- Win + G: Pressing Win + G brings up the Xbox Game Bar. Pick up the camera icon and press the “Capture” button. This tool will then save a picture to C: By default, go to Users > (user name) > Videos > Captures.
- Win + Alt + Print Screen: Take a picture of just the open window by pressing Win + Alt + Print Screen. A picture is saved to C: with this command. By default, go to Users > (user name) > Videos > Captures.
Windows will sometimes flash or dim the screen to let you know that it has taken a screenshot. Instead, find the Hidden Icons menu and look for the cloud icon (it’s got an arrow going up) or click on it next to the System clock.
OneDrive in Windows 10 and 11
You can use OneDrive to save pictures from your Windows PC to the cloud, where they can be viewed on any device. But by default, it doesn’t save images. However, pictures are not saved by default. Instead, find the Hidden Icons menu and look for the cloud icon (it’s got an arrow going up) or click on it next to the System clock.
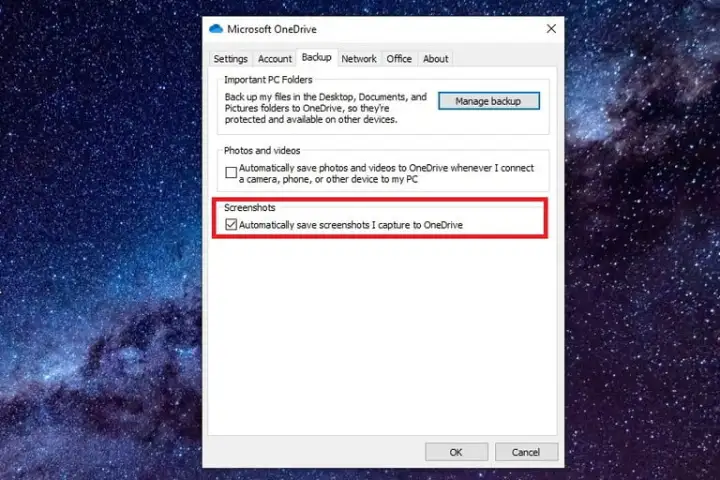
You should open the OneDrive app and sign in to your account before this icon shows up. When you see the Help & Settings Gear button, click it. Then, when the menu comes up, choose Settings. Next, in the new window that comes up, click on the Backup tab and check the box next to Screenshots. After that, click OK.
In Windows 11, go to Settings and then click on the Sync and Backup tab on the left. On the screen for Sync and backup, check the box next to Save screenshots I take to OneDrive.
To directly save an image file to OneDrive, press and hold the first two Print Screen keys. Instead of a screen flicker or dimming, you will receive a notice for these orders. You must sync the Screenshots folder in order to view the images on your personal computer.
How to take a screenshot on other devices
If you want to learn how to take a picture on a Mac instead of a PC running Windows, then it’s also straightforward. You can do it a few different ways, but the best way is to use some helpful keyboard shortcuts. With Command + Shift + 3, you can take a picture of the whole screen. With Command + Shift + 4, you can make a selection box.
Want to take a picture on a Microsoft Surface device? Check out our helpful guide that talks about a number of ways to do it.
As before, there are a few different ways to take a picture on a Chromebook. The simplest is to use a keyboard shortcut. If you press Control + Show Windows, you can grab the whole screen. If you press Control + Shift + Show Windows, you can capture a particular area.


