

Dark Mode on macOS has evolved well beyond aesthetics. As of 2026, with Apple continuing to refine macOS Sequoia updates and previewing interface behavior aligned with future Apple Silicon displays, Dark Mode now plays a measurable role in visual comfort, focus management, and power efficiency depending on how and when it’s used.
What most guides fail to explain is why Dark Mode works better for some users than others, how macOS handles it differently across apps, and when it can actually reduce readability instead of improving it. This guide breaks down the mechanics, current research, and real-world usage patterns so you can use Dark Mode intentionally, not just enable it.
What Is Dark Mode on Mac — and Why It Works (Scientifically)
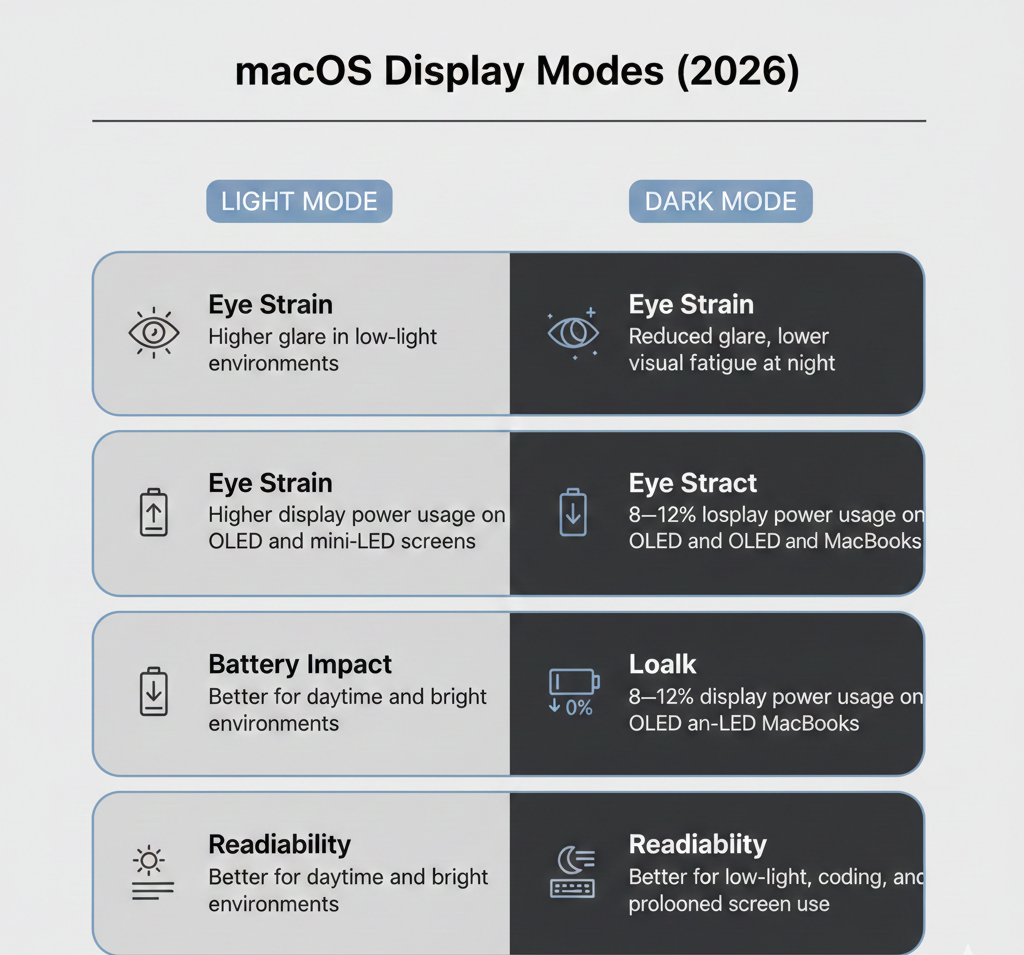
Dark Mode replaces light UI backgrounds with darker tones while maintaining contrast for text, icons, and UI controls. The benefit isn’t darkness, it’s controlled luminance.
Why Dark Mode Reduces Visual Fatigue
A 2024–2025 University of Vienna eye-tracking study found that darker UI environments:
-
Reduce involuntary micro eye movements during long reading sessions
-
Lower glare-induced pupil dilation in dim environments
-
Improve sustained attention when contrast ratios are preserved
Apple’s Dark Mode avoids pure black for this reason. Instead, it uses dark grays and adaptive contrast layers, preventing eye strain caused by extreme light-to-dark transitions.
Expert UX insight (2026):
“Dark Mode works best when it reduces background brightness without sacrificing contrast hierarchy. macOS is effective because it adjusts tone depth dynamically, not statically.”
Key Benefits of Mac Dark Mode in 2026 (Explained Clearly)
1. Better Focus Through Reduced Visual Noise
Bright UI elements compete with content for attention. Dark Mode minimizes peripheral brightness, making:
-
Text blocks easier to track
-
Timelines clearer in editing apps
-
Code syntax stand out more distinctly
This is why developers, writers, and video editors report higher “flow-state” consistency in Dark Mode environments.
2. Battery Efficiency — But Only on Certain Macs
According to Apple developer power documentation (2025 update):
-
OLED and mini-LED MacBook displays can see 8–12% lower display power usage in Dark Mode
-
LCD-based MacBooks see little to no battery change
Why this matters in 2026:
Dark Mode saves energy only when individual pixels emit less light. On backlit LCDs, brightness remains constant regardless of interface color.
3. Reduced Eye Strain in Low-Light Work
Dark Mode lowers luminance contrast between screen and environment especially when paired with Night Shift reducing dryness and eye tension during evening sessions.
However, in bright daylight, Dark Mode can reduce readability, which is why Auto mode is increasingly recommended.
How to Turn On Dark Mode on Mac (All Current Versions)
Option 1: System Settings (Best Overall)
macOS Sequoia and later
-
Apple menu () → System Settings
-
Select Appearance
-
Choose:
-
Light – fixed bright UI
-
Dark – fixed dark UI
-
Auto – switches based on local sunset/sunrise
-
Why Auto Is Best in 2026:
Auto mode aligns UI brightness with circadian rhythm data, reducing eye fatigue without sacrificing daytime clarity.
Option 2: Control Center (Fastest Toggle)
-
Click Control Center (menu bar)
-
Open Display
-
Toggle Dark Mode
Use case: Ideal for designers and editors switching between color-critical and comfort-focused environments.
Option 3: Siri (Hands-Free)
Say:
“Hey Siri, turn on Dark Mode.”
Siri also supports Auto Appearance and Focus-based changes.
How Dark Mode Behaves Across macOS Apps (Important Differences)
Dark Mode support is system-wide but each app implements it differently, which affects usability.
App |
Dark Mode Behavior |
Custom Control |
|---|---|---|
Mail |
Dark UI, bright message text |
Disable dark email backgrounds |
Safari |
Supports site-level dark themes |
Reader View for unsupported sites |
Notes |
Dark background + text |
Optional light note backgrounds |
Maps |
Automatically dark at night |
Force light mode manually |
TextEdit |
Dark document canvas |
Toggle per window |
Why this matters:
Many readability complaints stem from app-level overrides not Dark Mode itself.
Dark Mode vs Night Shift vs True Tone (2026 Comparison)
These features are often confused, but they serve distinct roles.
Feature |
What It Changes |
Best For |
|---|---|---|
Dark Mode |
UI brightness & contrast |
Focus, reduced glare |
Night Shift |
Screen color temperature |
Sleep & evening comfort |
True Tone |
White balance via ambient light |
Consistent color perception |
Best setup (2026):
-
Daytime: Auto AppearancezAppearance + True Tone
-
Evening: Dark Mode + Night Shift
-
Color work: Disable Night Shift, keep Dark Mode optional
Advanced: Automate Dark Mode Like a Power User (2026)
Time-Based Automation
Use Shortcuts → Automation to:
-
Enable Dark Mode after a fixed hour
-
Disable it at a custom morning time
Focus Mode Integration
Link appearance to Focus Modes:
-
“Work” → Dark Mode ON
-
“Personal” → Auto or Light
Why this works:
It makes appearance context-aware matching your cognitive state, not just the clock.
Does Dark Mode Always Improve Productivity? (Honest Answer)
No. Dark Mode improves comfort and focus in low-light or prolonged sessions, but it can:
-
Reduce readability in bright environments
-
Increase eye effort for long-form reading in daylight
Best practice:
Use Auto mode or switch manually based on lighting not habit.
Common Questions About Mac Dark Mode (2026)
Why do some websites stay bright in Dark Mode?
Because they don’t support system-level theming. Browser tools like Reader View or forced dark extensions can help.
Can I schedule Dark Mode without Auto?
Yes. Shortcuts automation allows precise time windows.
Does Dark Mode affect screenshots?
Yes. Screenshots capture the active UI appearance.
Is Dark Mode better for kids or students?
Only in low light. During daytime study, Light or Auto mode is usually better for reading speed.
Final Thoughts: How to Use Dark Mode the Right Way in 2026
In 2026, Mac Dark Mode is best viewed as a situational productivity tool, not a permanent setting. When combined with Auto Appearance, Night Shift, and Shortcuts automation, it improves comfort, focus, and in the right hardware battery life.
The key isn’t choosing Dark Mode, it’s knowing when to use it and when not to. Used intentionally, it becomes one of macOS’s most underrated performance features.


