

If you’re trying to cs2 show fps, you’re usually chasing one of two things: figuring out why the game feels off, or dialing in settings for consistent performance. The good news is CS2 gives you multiple ways to show fps, from a simple fps counter to a more detailed telemetry readout that includes frame time. Some competitive players also turn to CS2 Premier boost services to reach higher ratings once their performance is optimized.
Below are the cleanest methods, plus a few commands and settings tweaks that actually help when you’re dealing with low fps or random stutters.
How to Show FPS in CS2?
There are multiple ways to get an fps display on your screen. The “best” method depends on what you want to see while playing and how much clutter you can tolerate.
Method 1: Use the Developer Console
This is the classic answer for how to show fps in cs2, and it’s still the quickest.
- Open CS2 settings.
- Go to the Game tab.
- Find enable developer console and set it to Yes.
- In a match, press the tilde key (~) to open the console.
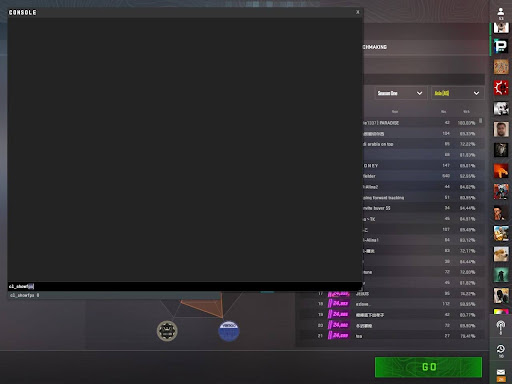
- Type `cl_showfps 1` and press enter.
You’ll now see an fps counter in the top left corner of your screen. If you ever want it gone, open the console again, type `cl_showfps 0`, then press enter.
If you were specifically looking for the cs2 show fps command, this is the one most players use day to day.
Method 2: Turn on Telemetry in CS2
Valve’s telemetry options are great when you want more than just a number. This method is also ideal if you don’t want to touch any command lines.
- Open Settings.
- Go to the Game tab.
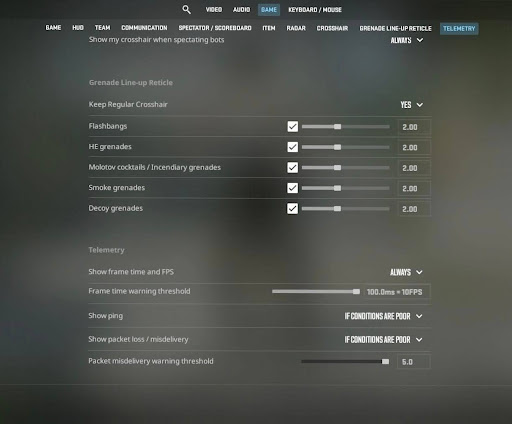
- Scroll to the Telemetry section.
- Set “Show frame time and FPS” to Always.
This gives you a clean display fps readout, and the frame time line is often the real clue when performance feels choppy even at “good” fps.
If you also want how to show fps in cs2 and ping, Telemetry is usually the simplest place to enable ping on screen without extra overlays.
Method 3: Use the Steam Overlay FPS Counter
If you’re looking for something that will work with any game on the system, use the Steam overlay.
- Open Steam.
- Click Steam -> Settings in the top left.
- Go to the In Game tab.
- Enable the in-game FPS counter and choose a position for it, such as the left corner.
This will display a lightweight fps counter, but it will not display any other information. It’s good if you just want to glance at your fps in cs2.
Method 4: Make it Permanent with Launch Options
If you don’t want to retype the same fps command every time you launch, set it once.
- In Steam Library, right-click CS2 -> Properties.
- Stay on the General page.
- Add this to launch options: `+cl_showfps 1`
That’s it. Every time the game opens, it will show your fps automatically.
Tip: you’ll sometimes see people write it with a dash, but for Source style startup commands, the plus format is the reliable method.
Optional: Create an Autoexec File
If you enjoy having your settings locked in, you can create an autoexec file and place your commands there.
– Create `autoexec.cfg` in your CS2 cfg folder.
– Add `cl_showfps 1`
– Save the file, then add `+exec autoexec.cfg` to launch options.
This is overkill for most players, but it’s nice if you already use binds and other console tweaks.
Best CS2 Console Commands for FPS Boost
Let’s be honest, most of the “fps boost commands” are either outdated, a placebo, or a tradeoff of visual quality for a small gain. Having said that, there are a few commands that are actually useful for stability, troubleshooting, and maintaining consistent frames. If you’re not sure how to access them, this how to enable console guide will walk you through the setup.
Essential Commands to Know
– `cl_showfps 1`
This is the command to show your FPS in cs2. Simple and clean with minimal visual clutter.
– `fps_max 0`
This command allows your framerate to be as high as possible. Good for testing your system’s limit.
– `fps_max 240` or other number
Capping your framerate can make your game feel smoother as your framerate won’t fluctuate as much. A smooth framerate is more enjoyable than a constantly fluctuating one.
Network and Performance Graphs
If you’re looking for “lag,” you should be aware if it’s fps issues or networking issues.
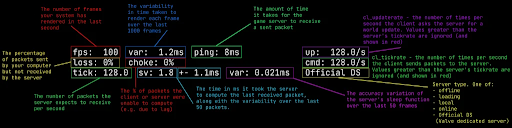
– Telemetry can display ping and packet loss in an easy-to-understand way.
– Some builds also have the option to display a “net graph style” using new commands (this was different in the older net_graph in CS2).
If you’re experiencing lag in shots but fps is okay, it’s probably networking/server issues. If you’re experiencing lag in the game but ping is okay, it’s probably performance issues.
A quick note on overlays
Steam overlay is generally okay, but using multiple overlays together is known to cause problems on some systems. If you’re trying to debug something, it’s worth disabling other overlays temporarily and seeing if the problem goes away so you’re not trying to debug the wrong difference.
Why FPS Matters in CS2
With Counter-Strike, the game is the performance. Increasing your fps decreases input lag and makes your game look smoother.
Two very quick points that players tend to forget:
– Average FPS is not the full story; it is the time spikes that cause the “micro-stutter” problem.
– Monitor refresh rate is also important; if you’re running a 144Hz screen, you’ll want a consistent 144+ target rather than a fluctuating 200-300.
A practical way to think about it:
– Stable frames = more predictable aiming and recoil control.
– Unstable frames = your crosshair feels like it’s fighting you.
Tips to Increase FPS in CS2
Once you can see your numbers, you can actually improve them. Start with changes that give big wins without making the game look awful.
1) Fix the Biggest Hitters in Graphics Settings
If you are trying to increase your FPS, here are some settings that will increase your FPS quickly:
– Disable shadows first, as they are expensive and not worth it competitively.
– Turn down settings that have big spikes when you use utilities.
– Turn up settings that will help you with your visibility, but don’t go overboard with settings that you will never see during a match.
Don’t mess with too many settings at once, as this will only confuse you. Try messing with one setting, playing a match, and then messing with another setting. For more performance tips and competitive guides, visit eloboss.net.
2) Close Background Apps That Steal CPU Time
The biggest culprits are your web browser, your recording software, your rgb software, and your random launchers. If your FPS drops when there are more events happening on your screen, it’s probably your CPU scheduling, not your GPU.
To check this, here’s a clean test:
– Close everything you don’t need
– Restart your game
– Check your fps in cs2 with the same map/practice scenario
3) Use a Smart FPS Cap for Smoother Gameplay
Uncapped FPS can be great, but it can also be very unstable in smokes, mollies, etc. A cap can make it smooth even if FPS is lower.
Pick a number that you can get consistently, rather than a number you get in spawn.
4) Diagnose “Lag” the Right Way
If the game feels bad, the fps and the network are the areas to focus on:
– Low fps with good ping points towards hardware issues.
– Good fps with bad ping points towards network issues.
– Messy fps and ping? Try reducing background loads first.
This is where Telemetry really shines because it shows the important info while you’re actually playing the game.


